Your VPS is not anonymous. The moment an IPv4 address is assigned to your server, it becomes part of a public range that automated scanners sweep continuously. Log in to a brand-new box, run journalctl -u ssh --since "10 minutes ago", and you will usually find failed root logins already stacking up — from hosts you have never heard of, in countries you have never visited.
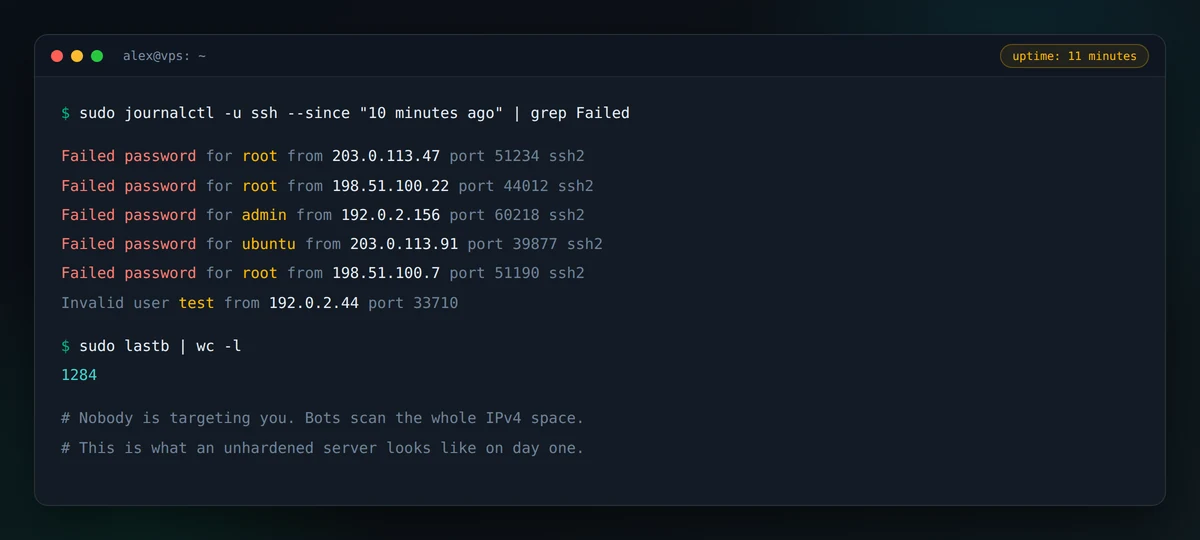
None of that is personal. It is background radiation. Bots enumerate address space, knock on port 22, try root:admin, root:123456, ubuntu:ubuntu, and move on. The overwhelming majority of compromised servers are not victims of clever attacks; they are victims of defaults left untouched.
The good news is that the fix is boring and finite. You can secure a Linux VPS to a genuinely respectable baseline in about thirty minutes, and most of that time is spent waiting for apt to finish. This guide walks through the sequence we would follow on any new Ubuntu or Debian box, with the reasoning behind each step, because a checklist you understand is one you will actually maintain.
Tested on Ubuntu 26.04 LTS. Every command below also works unchanged on Ubuntu 24.04 LTS and Debian 13 except where noted.
Start From a Clean, Current Image
Security begins before your first SSH session. When you deploy, choose a current LTS release rather than whatever is familiar — Ubuntu 26.04 LTS or Debian 13 both carry years of security support ahead of them, which means patches keep arriving without a distribution upgrade in the middle of your busiest quarter. An OS approaching end of life is a slow-motion vulnerability.
If your provider offers SSH key injection at deploy time, use it. Every NodeGuard Cloud VPS can be provisioned with your public key already in place, which means the server never has a password-authenticated root account exposed to the internet, not even for the ten minutes it takes you to configure one. That closes the single most common window of exposure entirely.
Patch Before You Do Anything Else
Images are snapshots. Even a freshly published one was built days or weeks ago, and the packages inside it are frozen at that moment. Your first command should always be:
sudo apt update && sudo apt full-upgrade -y
sudo reboot
full-upgrade rather than upgrade matters here: it allows packages to be added or removed when dependencies changed, which is exactly what happens with kernel and library updates. Reboot afterward if the kernel was replaced — a patched kernel sitting on disk while the vulnerable one is still running protects nobody.
Create a Non-Root User With sudo
Working as root is a habit worth breaking. Not because root is inherently dangerous, but because it removes the pause between intent and consequence. A mistyped rm -rf under a normal account throws a permission error; the same command as root does exactly what you asked.
adduser alex
usermod -aG sudo alex
rsync --archive --chown=alex:alex ~/.ssh /home/alex
That last line copies your existing authorized key to the new user before you lock root out — skip it and you will lock yourself out instead. Open a second terminal and confirm you can log in as the new user and run sudo -v successfully. Do not close your original session until that works. This is the single most common way people strand themselves on a fresh server.
Lock Down SSH
SSH is the front door, and it deserves the most attention. Edit /etc/ssh/sshd_config or, better, drop a file into /etc/ssh/sshd_config.d/99-hardening.conf so your changes survive package upgrades cleanly. Every directive here is documented in the OpenSSH manual.
PermitRootLogin no
PasswordAuthentication no
KbdInteractiveAuthentication no
PubkeyAuthentication yes
MaxAuthTries 3
X11Forwarding no
AllowUsers alex
If you have a static IP or connect through a VPN, tighten it further with AllowUsers alex@your.static.ip so SSH only answers from an address you control.
Why key-only authentication is non-negotiable
A strong password is guessable given enough attempts; a 4096-bit RSA or Ed25519 key is not, in any timeframe that matters. Turning off password authentication does not merely make brute-force attacks harder — it makes them structurally impossible. The bots will keep knocking, and every attempt will fail at the protocol level before a password is ever evaluated.
Generate your key locally, never on the server:
ssh-keygen -t ed25519 -C "workstation-2026"
ssh-copy-id alex@your-server-ip
Changing the port, and one modern gotcha
Moving SSH off port 22 is not real security — a port scan finds it in seconds — but it does cut log noise by an enormous margin, which makes genuine anomalies visible. If you change it, be aware of a change in recent releases: Ubuntu 24.04 and 26.04 use socket activation for SSH. The Port directive in sshd_config is ignored, because systemd owns the listening socket. Setting a new port and reloading will appear to work and then refuse connections.
The most reliable fix is to bypass socket activation entirely:
sudo systemctl disable --now ssh.socket
sudo systemctl enable --now ssh.service
sudo ss -tulpn | grep sshd
That final verification step is the important one. Always confirm the daemon is listening where you think it is, from a second session, before you disconnect.
Put a Default-Deny Firewall in Front
A firewall’s job is not to block known-bad traffic. It is to permit only known-good traffic, so that a service you forgot you installed cannot quietly accept connections from the world.
sudo ufw default deny incoming
sudo ufw default allow outgoing
sudo ufw allow 2222/tcp    # your SSH port — add this FIRST
sudo ufw allow 80,443/tcp
sudo ufw enable
sudo ufw status verbose
Add the SSH rule before enabling, every single time. UFW will warn you, and the warning is not decorative.
Two things worth knowing. First, databases should almost never appear in this list — MariaDB, PostgreSQL, and Redis belong bound to 127.0.0.1, reachable by your application and nothing else. Second, if you sit behind a CDN or proxy such as Cloudflare, your firewall sees the proxy’s IP rather than the visitor’s. Restore the real client IP at the web-server layer, or your logs and rate limits will be measuring the wrong thing.
Slow Down Brute Force With Fail2Ban
Even with key-only SSH, repeated failed attempts consume resources and bury real events in noise. Fail2Ban reads your logs and firewalls off repeat offenders automatically.
sudo apt install fail2ban -y
Create /etc/fail2ban/jail.local — never edit jail.conf, which package updates overwrite:
[DEFAULT]
bantime  = 1h
findtime = 10m
maxretry = 5
backend  = systemd
[sshd]
enabled = true port = 2222
On current Ubuntu and Debian releases the systemd backend matters, because journald has largely replaced flat log files. Check your work with sudo fail2ban-client status sshd. Also whitelist your own static IP under ignoreip if you have one — Fail2Ban does not distinguish between an attacker and a sysadmin who fat-fingered a passphrase five times.
Turn On Automatic Security Updates
The gap between a vulnerability being disclosed and being exploited at scale is now measured in hours. Manual patching cannot win that race, and most breaches exploit something that was fixed upstream weeks earlier.
sudo apt install unattended-upgrades -y
sudo dpkg-reconfigure --priority=low unattended-upgrades
The default configuration applies security updates only, which is the right balance — you get patched without feature updates surprising you at 3 a.m. If you want unattended reboots for kernel updates, enable Unattended-Upgrade::Automatic-Reboot with a scheduled time, and make sure your services start cleanly on boot before you trust it.
Reduce the Attack Surface
Every listening service is a potential entry point. Audit what your server is actually exposing:
sudo ss -tulpn
sudo systemctl list-units --type=service --state=running
Look for anything you did not deliberately install. Stock images frequently ship with services you will never use. Remove them rather than merely stopping them — an uninstalled package cannot be started by a dependency later. Where a service must run but only serves local traffic, bind it to 127.0.0.1 instead of 0.0.0.0. That one change is worth more than most firewall rules, because it holds even if the firewall is misconfigured.
Harden the Kernel and Shared Memory
A small set of sysctl values closes off common network-level tricks. Add them to /etc/sysctl.d/99-hardening.conf:
net.ipv4.conf.all.rp_filter = 1
net.ipv4.conf.all.accept_redirects = 0
net.ipv4.conf.all.send_redirects = 0
net.ipv4.conf.all.accept_source_route = 0
net.ipv4.icmp_echo_ignore_broadcasts = 1
net.ipv4.tcp_syncookies = 1
kernel.dmesg_restrict = 1
Apply with sudo sysctl --system. These are conservative, widely deployed settings; they will not break a normal web or application server, and they remove several classes of spoofing and reconnaissance outright.
Secure the Application Layer
Server hardening is necessary but insufficient. In practice, the majority of real-world compromises on hosting infrastructure arrive through the application, not the operating system.
- Serve everything over TLS. Certbot issues free Let’s Encrypt certificates and renews them automatically. Redirect HTTP to HTTPS at the web server or CDN, and enable HSTS once you are confident the site works without exception.
- Use per-application database users. One database, one user, only the privileges that application needs. A SQL injection in a marketing site should never expose your billing data.
- Isolate PHP applications. Separate PHP-FPM pools per site, each running as its own system user, mean a compromised plugin in one site cannot read files belonging to another.
- Keep WordPress lean. Most WordPress breaches trace back to an abandoned plugin or theme. Delete what you do not use, enable automatic updates for the core and for plugins you trust, and enforce strong credentials with two-factor authentication on admin accounts.
- Restrict file permissions. Web roots should be
755for directories and644for files, owned by a user the web server can read but generally cannot write.
Back Up as Though You Will Need It
Assume, calmly, that something will eventually go wrong — a bad deploy, a failed disk, a successful attack. The question is not whether you have backups, but whether you have restores.
A workable pattern: a nightly mysqldump plus a compressed archive of your web roots, retained locally for a week, and copied off-server to separate storage. Backups that live only on the machine they protect are not backups. And schedule a restore drill — pull last night’s archive onto a scratch server and bring the site up. The first time you attempt a restore should never be during an incident.
Watch What You Have Built
Hardening is a state, not an event. A light monitoring rhythm keeps that state from decaying:
- Review authentication failures and Fail2Ban bans weekly:
sudo lastb | head -20 - Confirm unattended upgrades are actually applying:
cat /var/log/unattended-upgrades/unattended-upgrades.log - Track disk, memory, and load, so that a resource anomaly reaches you before your visitors do
- Watch for unexpected outbound connections — compromised servers usually phone home
How to Secure a Linux VPS: Your 30-Minute Checklist
- Deploy a current LTS image with your SSH key injected
apt update && apt full-upgrade, then reboot- Create a sudo user, copy your key, verify in a second terminal
- Disable root login and password authentication in
sshd_config.d - Change the SSH port, working around socket activation, and verify with
ss -tulpn - Enable UFW with default-deny, allowing SSH first
- Install Fail2Ban with a
jail.localusing the systemd backend - Enable
unattended-upgrades - Audit listening services; bind local-only services to
127.0.0.1 - Apply
sysctlhardening - Issue TLS certificates and lock down the application layer
- Configure off-server backups — and test a restore
None of this is exotic. It is the same sequence experienced administrators run on autopilot, and it eliminates the overwhelming majority of opportunistic attacks, because opportunistic attacks depend entirely on defaults.
How do I secure a Linux VPS?
Secure a Linux VPS by working through a fixed sequence: patch the system fully, create a non-root sudo user, switch SSH to key-only authentication and disable root login, enable a default-deny firewall, install Fail2Ban, and turn on automatic security updates. Those six steps stop the overwhelming majority of automated attacks, because automated attacks depend entirely on defaults being left in place. Everything after that — kernel tuning, application hardening, backups — reduces the damage of the attacks that get past the first layer.
How long does it take to harden a new VPS?
About thirty minutes for the core baseline, and most of that is spent waiting for apt to finish rather than typing. The steps that matter most — key-only SSH, a default-deny firewall, and unattended upgrades — take roughly ten minutes combined. Backups and application-layer hardening take longer and are worth scheduling separately, but the server is no longer low-hanging fruit once the first ten minutes are done.
Is changing the SSH port worth it?
Changing the SSH port is not a security measure, because a port scan finds the new port in seconds. It is a noise-reduction measure, and that is still valuable: moving off port 22 cuts automated login attempts by an enormous margin, which makes genuine anomalies visible in your logs instead of buried under thousands of bot entries. Change it if you want readable logs. Do not change it and consider the server secured.
Do I still need Fail2Ban if I use SSH keys?
Yes, though for a different reason than most people assume. With password authentication disabled, brute-force attempts cannot succeed — but they still consume CPU, bandwidth and log space, and they bury real events in noise. Fail2Ban also protects services beyond SSH, including web application logins and mail. Treat it as noise control and multi-service coverage rather than as your primary SSH defence.
At NodeGuard, our Cloud VPS instances ship with key-based access from first boot, automated monitoring, and clean current images across Ubuntu, Debian, AlmaLinux, Rocky, and Fedora — so the baseline above starts closer to done. Plans begin at €7/month with full root access, which means the server is genuinely yours to configure.
Harden it once, properly, and then get back to building the thing you actually wanted the server for.